GalMakes
Michael's Musical Keyboard
A custom portable keyboard for my son—powered by an ESP32-C3 microcontroller and built with tactile mechanical switches, speaker this toy combines hands-on fun with personalized sound.
Michael's Musical Keyboard
It all started when I worked from home in my office. My little boy got excited about my workstation—all the colors and flashes from the monitor, the sound coming from the speakers—but the most interesting object to him was my mechanical keyboard. He stared at me typing, watching my fingers move forward, backward, up and down while each press released a nice mechanical sound. It wasn't long before I couldn't work without my little assistant typing his gibberish on the screen. That's when I started thinking about what could give him a similar experience in a toy that he would enjoy playing with.
Design
I wanted to capture that same feeling in a toy, something tactile and fun, but also something more personal. That's when the idea hit me: what if each key press could be more than just a click? What if it could play a songs my son Michael loves—one for each letter of his name?
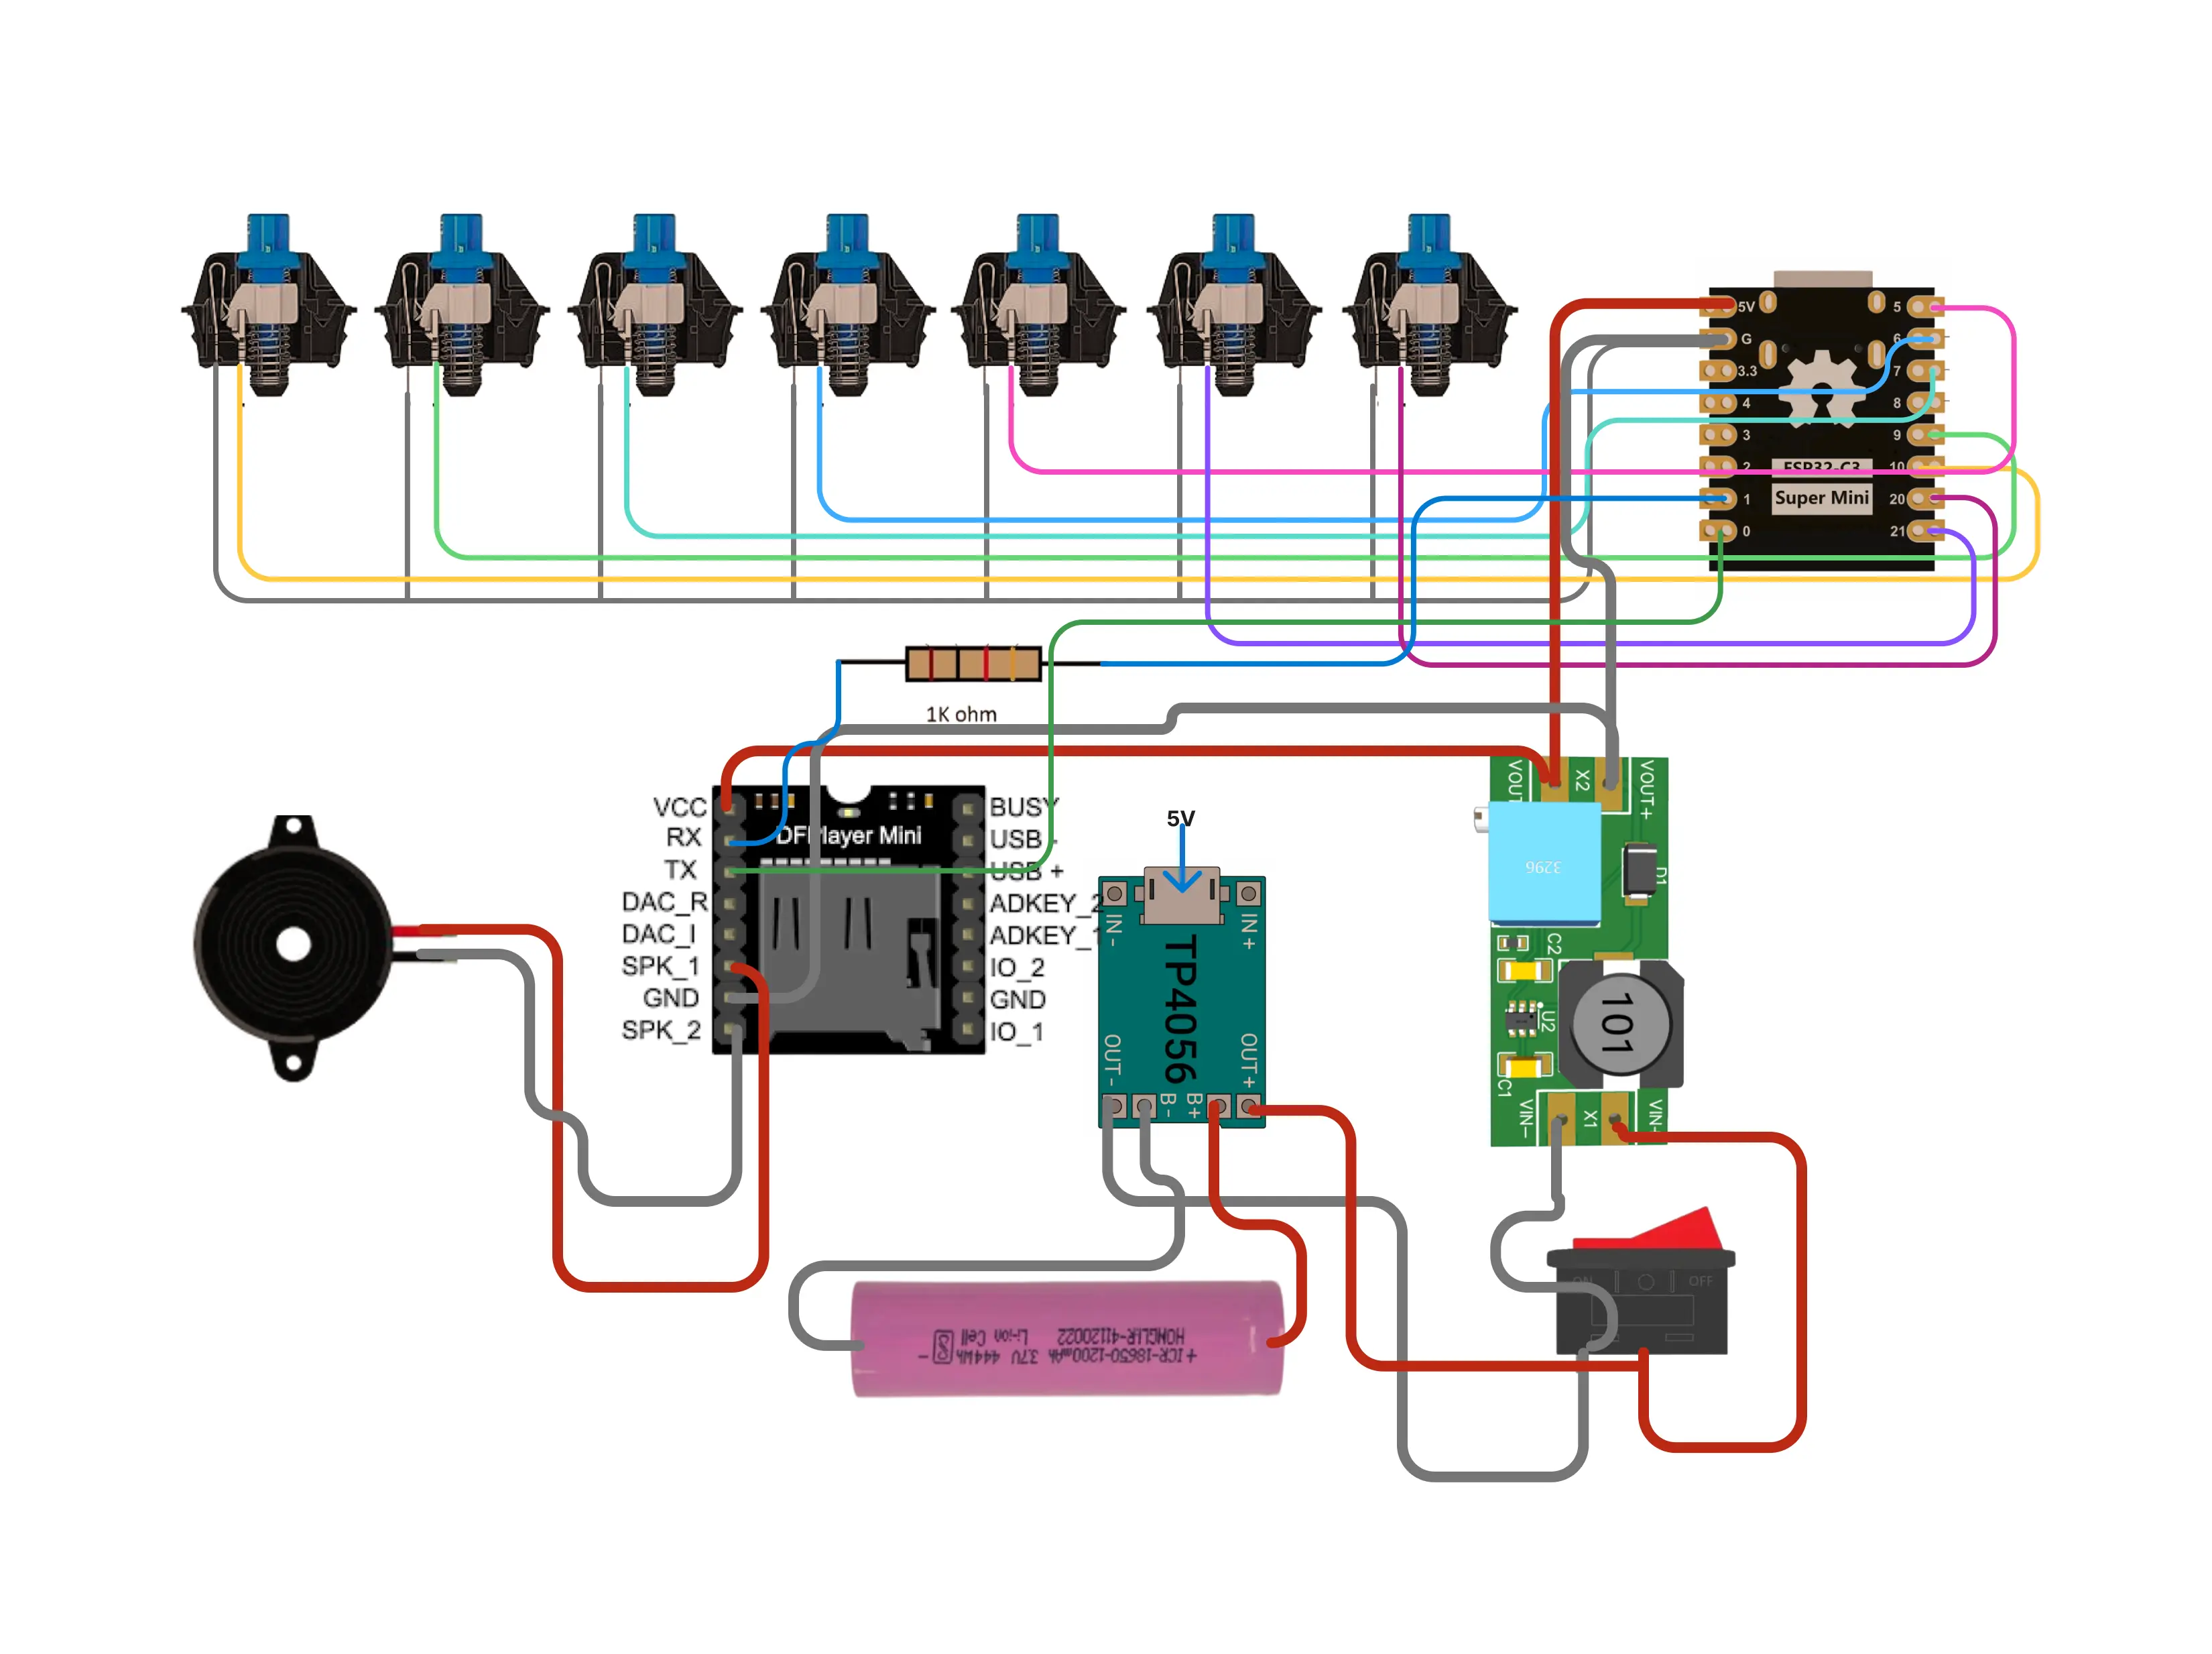
To bring this idea to life, I began piecing together the electronics. The heart of the project would be the ESP32-C3 Super Mini, a tiny but mighty microcontroller with just enough GPIOs to handle multiple buttons. I paired it with seven mechanical key switches—one for each letter—each one wired to the ESP32, ready to trigger a sound.
But this couldn't just be any toy. It needed to be portable, something Michael could carry around, so I added a rechargeable 18650 battery. To safely charge it, I used a TP4056 module, and to boost the battery's voltage to the necessary 5V, I wired in an MT3608 step-up converter. A simple slide switch lets us power it on and off easily—Because every good toy needs a power button—I don't want to accidentally step on it at night while he's asleep and have it start blasting his favorite songs.
For the sound system, I turned to the DFPlayer Mini—a compact MP3 module with its own amplifier. I loaded up a microSD card with Michael's favorite sounds, hooked up a small speaker, and connected it all to the ESP32. Now, every time he presses a key, it doesn't just click—It sings.
Electronic diagram maker
Project Steps: Build Your Personalized Audio Key Toy
1. Blink Test – Make Sure the ESP32 Works
Before diving into wiring, make sure your ESP32-C3 Super Mini is alive and programmable.
- Connect it to your PC via USB.
- Open Arduino IDE (or PlatformIO).
- Upload the basic Blink sketch. here is an example code
// Basic Blink Sketch for ESP32-C3
#include <Arduino.h>
#define LED_PIN 8  // Change to 2 if your board uses GPIO 2 for onboard LED

void setup() {
  pinMode(LED_PIN, OUTPUT); // Set the LED pin as an output
}

void loop() {
  digitalWrite(LED_PIN, HIGH); // Turn the LED on
  delay(1000);                 // Wait for 1 second
  digitalWrite(LED_PIN, LOW);  // Turn the LED off
  delay(1000);                 // Wait for 1 second
}
If you see the led blinking, this works, your ESP32 is functioning and your setup is good to go.
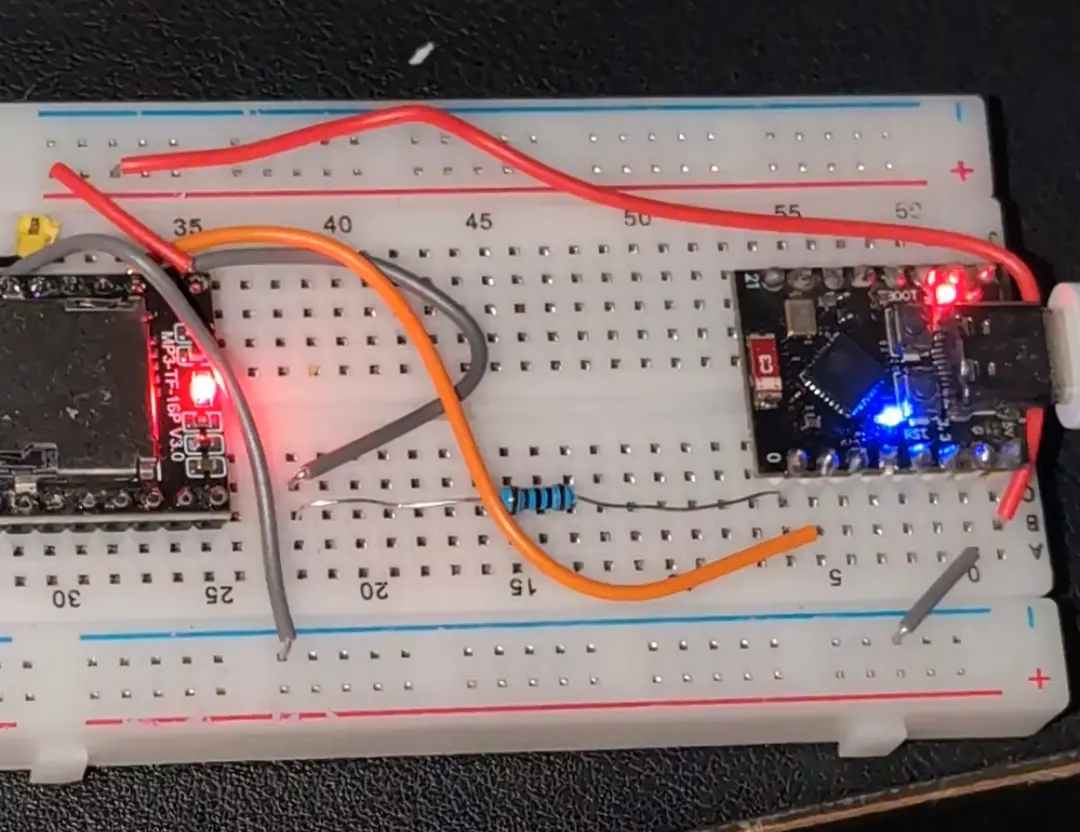
2. Breadboard Prototype – One Button, One Sound
Keep it simple to start: use a breadboard to connect just the essentials.
-
Wire up:
- ESP32-C3
- DFPlayer Mini
- 1k ohm resistor
- Speaker
Its hold looks like this:
-
Power the ESP32-C3 from your PC's USB or a 5V adapter (don't use the battery yet). then connect the DFPlayer to the 5v vin and gnd of the ESP32-C3. oncs we are starting to test diffren modules its importnat to keep all the modules GND connected.
-
Connect the DFPlayer via serial (TX/RX) to the ESP32-C3.the RX should have a 1k ohm resistor connected to the ESP32-C3. Do not forget to connect the GND of the DFPlayer to the GND of the ESP32-C3.
-
Upload to the SD card the sound file you want to play. Inoder that the sound file is in the root of the SD card and is named
001.mp3 -
Here is a code that will help you test the DFPlayer Mini, when you upload this code to the ESP32-C3 it will play a sound from the DFPlayer Mini.
// Test DFPlayer Mini with ESP32-C3
#include <Arduino.h>
#include <HardwareSerial.h>
#include <DFRobotDFPlayerMini.h>

HardwareSerial mySerial(1); // Use UART1
DFRobotDFPlayerMini myDFPlayer;

void setup() {
  Serial.begin(115200);
  mySerial.begin(9600, SERIAL_8N1, 20, 21); // RX=20, TX=21

  Serial.println("Initializing DFPlayer...");

  if (!myDFPlayer.begin(mySerial)) {
    Serial.println("Unable to begin. Check connections and SD card.");
    while (true);
  }

  Serial.println("DFPlayer Mini online.");

  myDFPlayer.volume(20);  // Set volume (0 to 30)
  myDFPlayer.play(1);     // Play track 0001.mp3
}

void loop() {
  // Nothing here
}
💡 This lets you test core functionality before scaling up.
3. Set Up the Power Supply: Battery + Charging
Now we bring in the battery and make it safe:
- Connect the 18650 battery to the TP4056 charger: do not solder the battery, use hot glue to keep it in place.
- Battery to
B+/B-
- Battery to
- Output from TP4056 to the MT3608 boost converter
- test the electric current the boost converter is giving,use a multimeter to see it, the adjust the MT3608 output to exactly 5V (it can go 3–12V, so test carefully!)
- This 5V will eventually power both ESP32 and DFPlayer
Don't connect to your circuit yet—just make sure the boost circuit is working first.
4. Let paln the Keyboard
I wanted to make the keyboard as small as possible, for that I first took the meserment of each part and module that are going to be asubled in to the keyboard case, then I designed the case in Fusion 360.
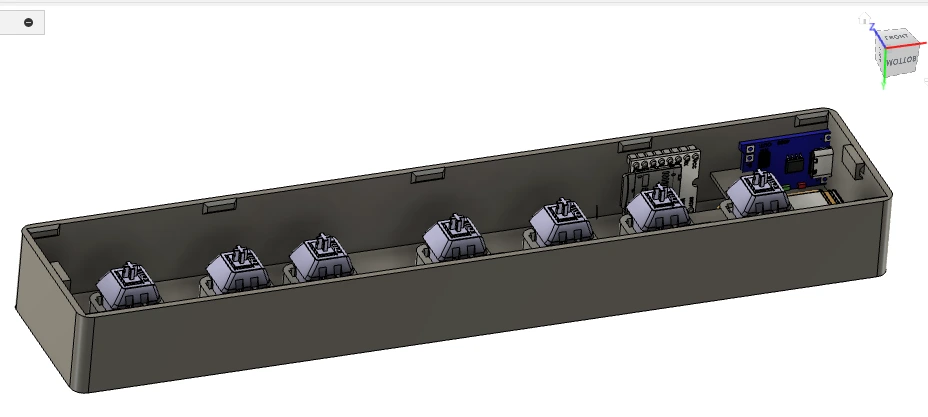 See here the position of each module in the keyboard case. for the ESP32-C3 I opened a hole in the case to fit the USB-C connector. and did the same for the charger TP4056.
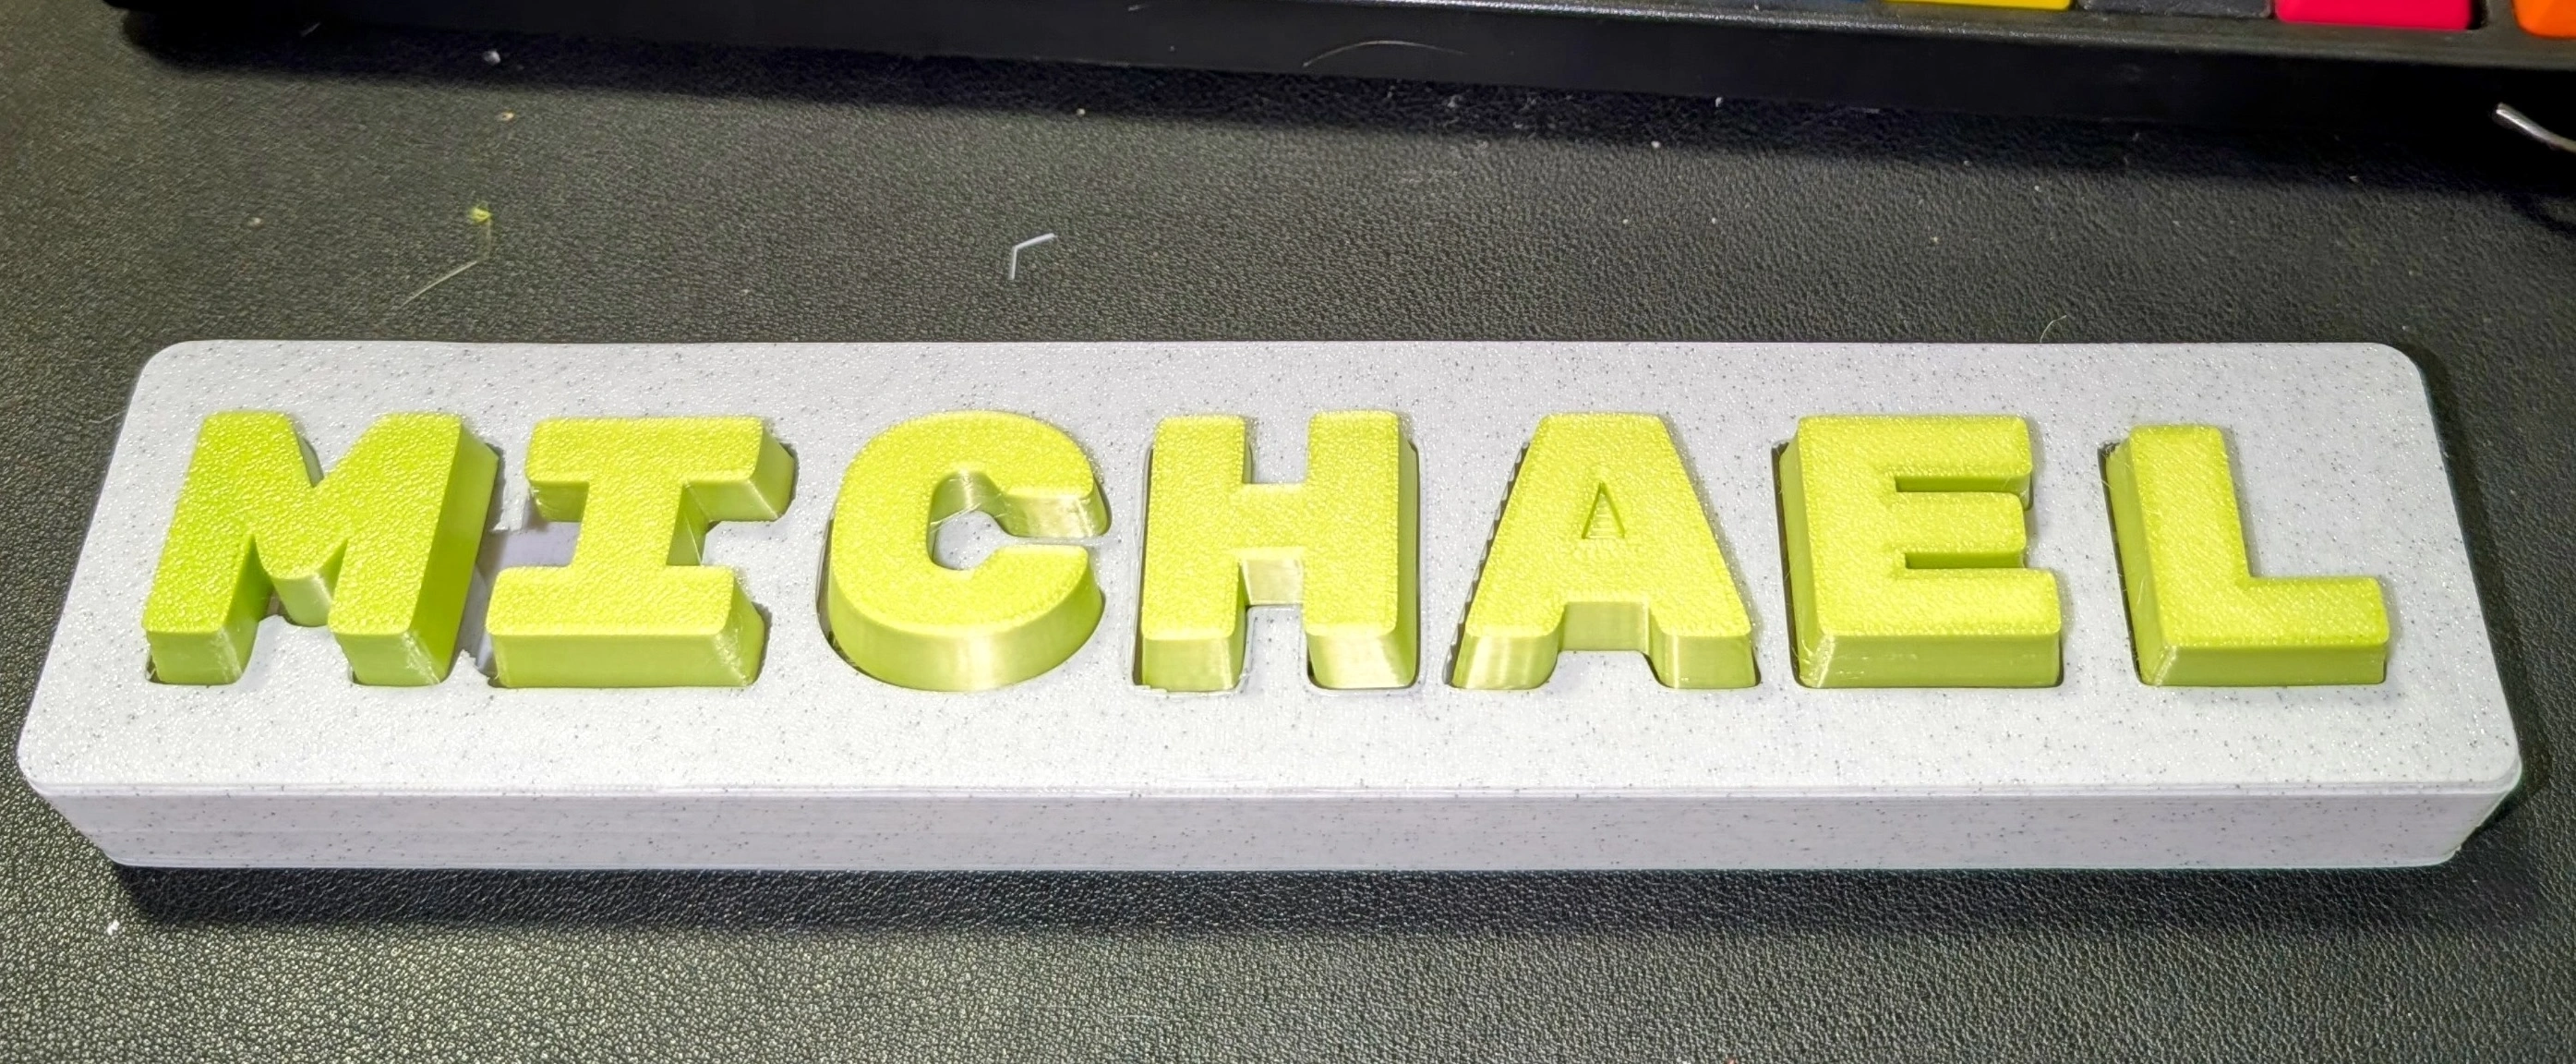
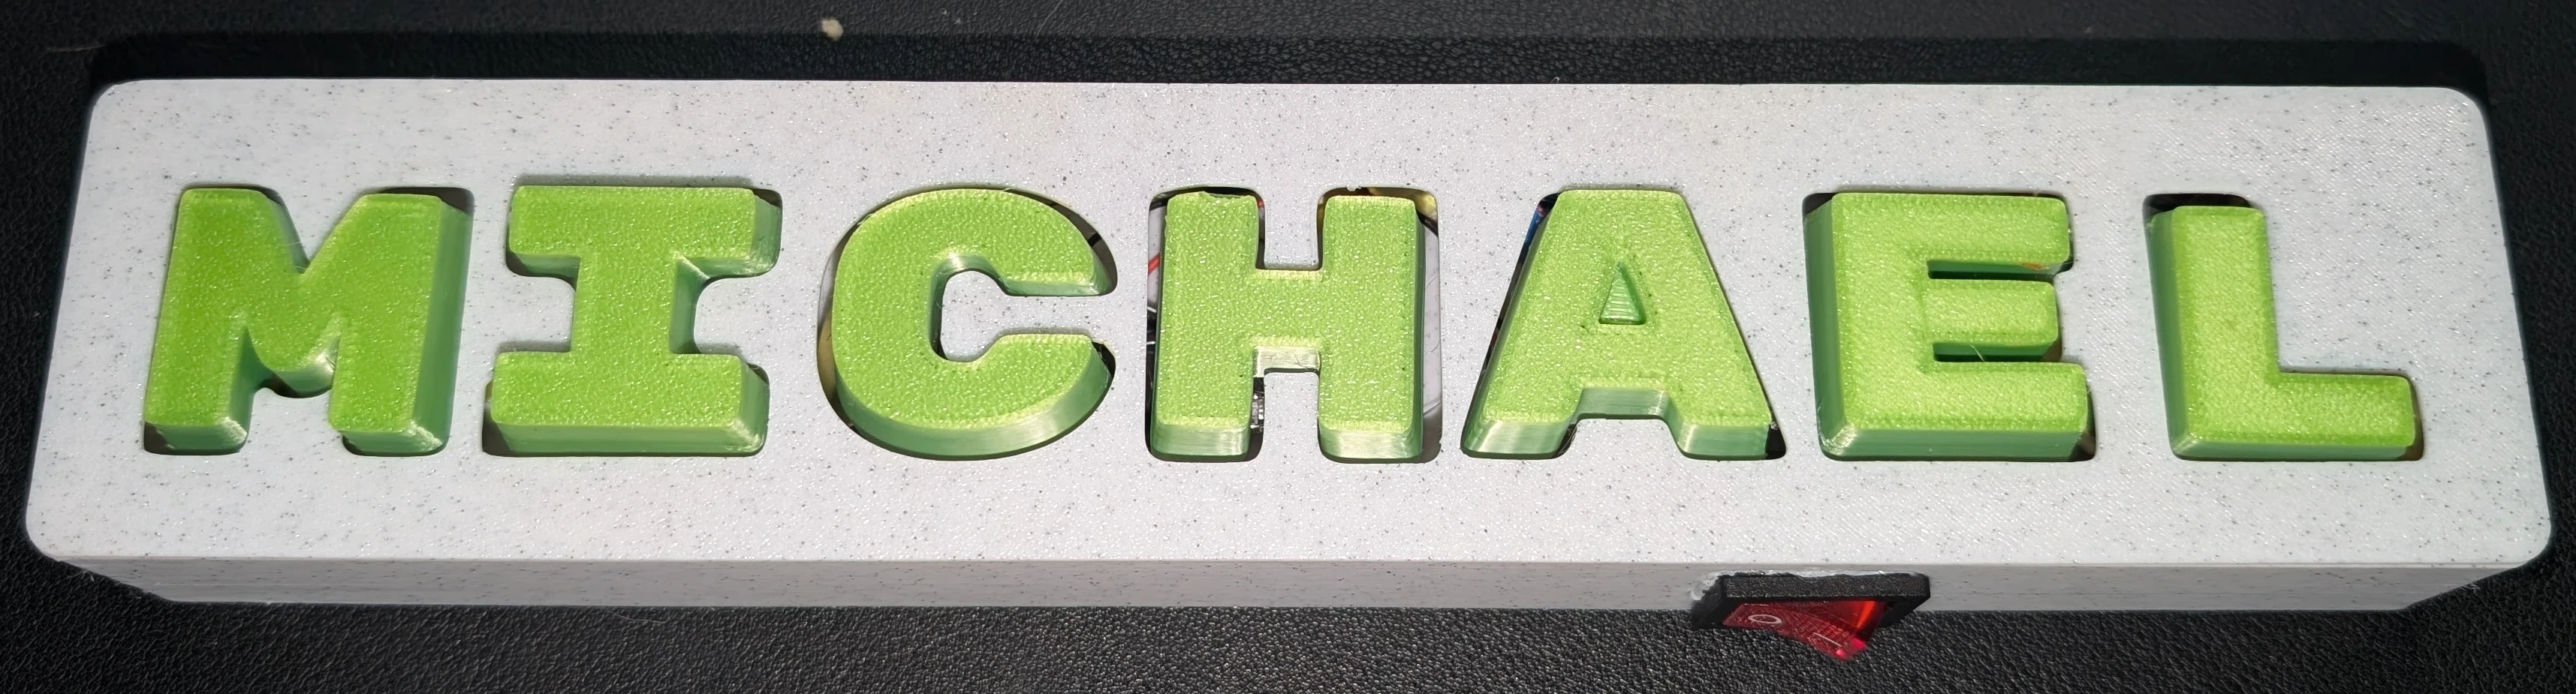
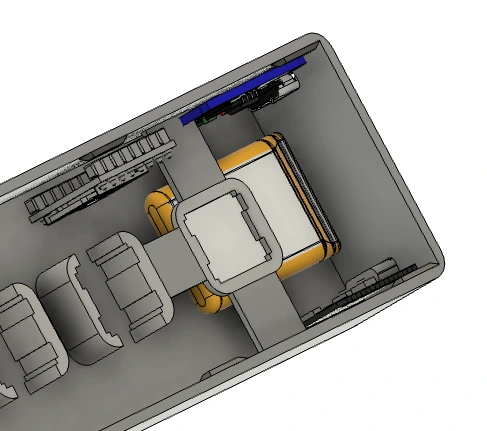 for the buttons I used the key switch so I had to create a custom plastic that will fit the key switch in the shape of Michael's name.
 Finaly I added the box cover, I designed in the box small clips to hold the case together. When puting the cover on the box with little pressure it will click and hold together.

5. Choose Your Sounds + Format the SD Card
Now it's time to personalize the toy:
- Pick up to 8 sound clips (e.g., songs, voice lines, animal sounds).
- Convert them to MP3 format.
- Format your microSD card as FAT32.
- Use the DFPlayer Mini's file naming convention:
- Files must be placed in a folder named
MP3 - File names should follow the pattern:
0001.mp3,0002.mp3, ...,0008.mp3
- Files must be placed in a folder named
DFPlayer uses numbers to index files, so button 1 plays 0001.mp3, button 2 plays 0002.mp3, and so on.
6. Plan Wiring + Final Soldering
Now that you know where everything goes:
- Plan wire lengths carefully—keep things clean and organized.
- Begin soldering all components together:
- ESP32 to each button
- ESP32 to DFPlayer
- MT3608 to ESP32 and DFPlayer
- Speaker to DFPlayer
- Label your wires if needed—it'll save time if you need to debug. I did not label mine, and its became a mess...
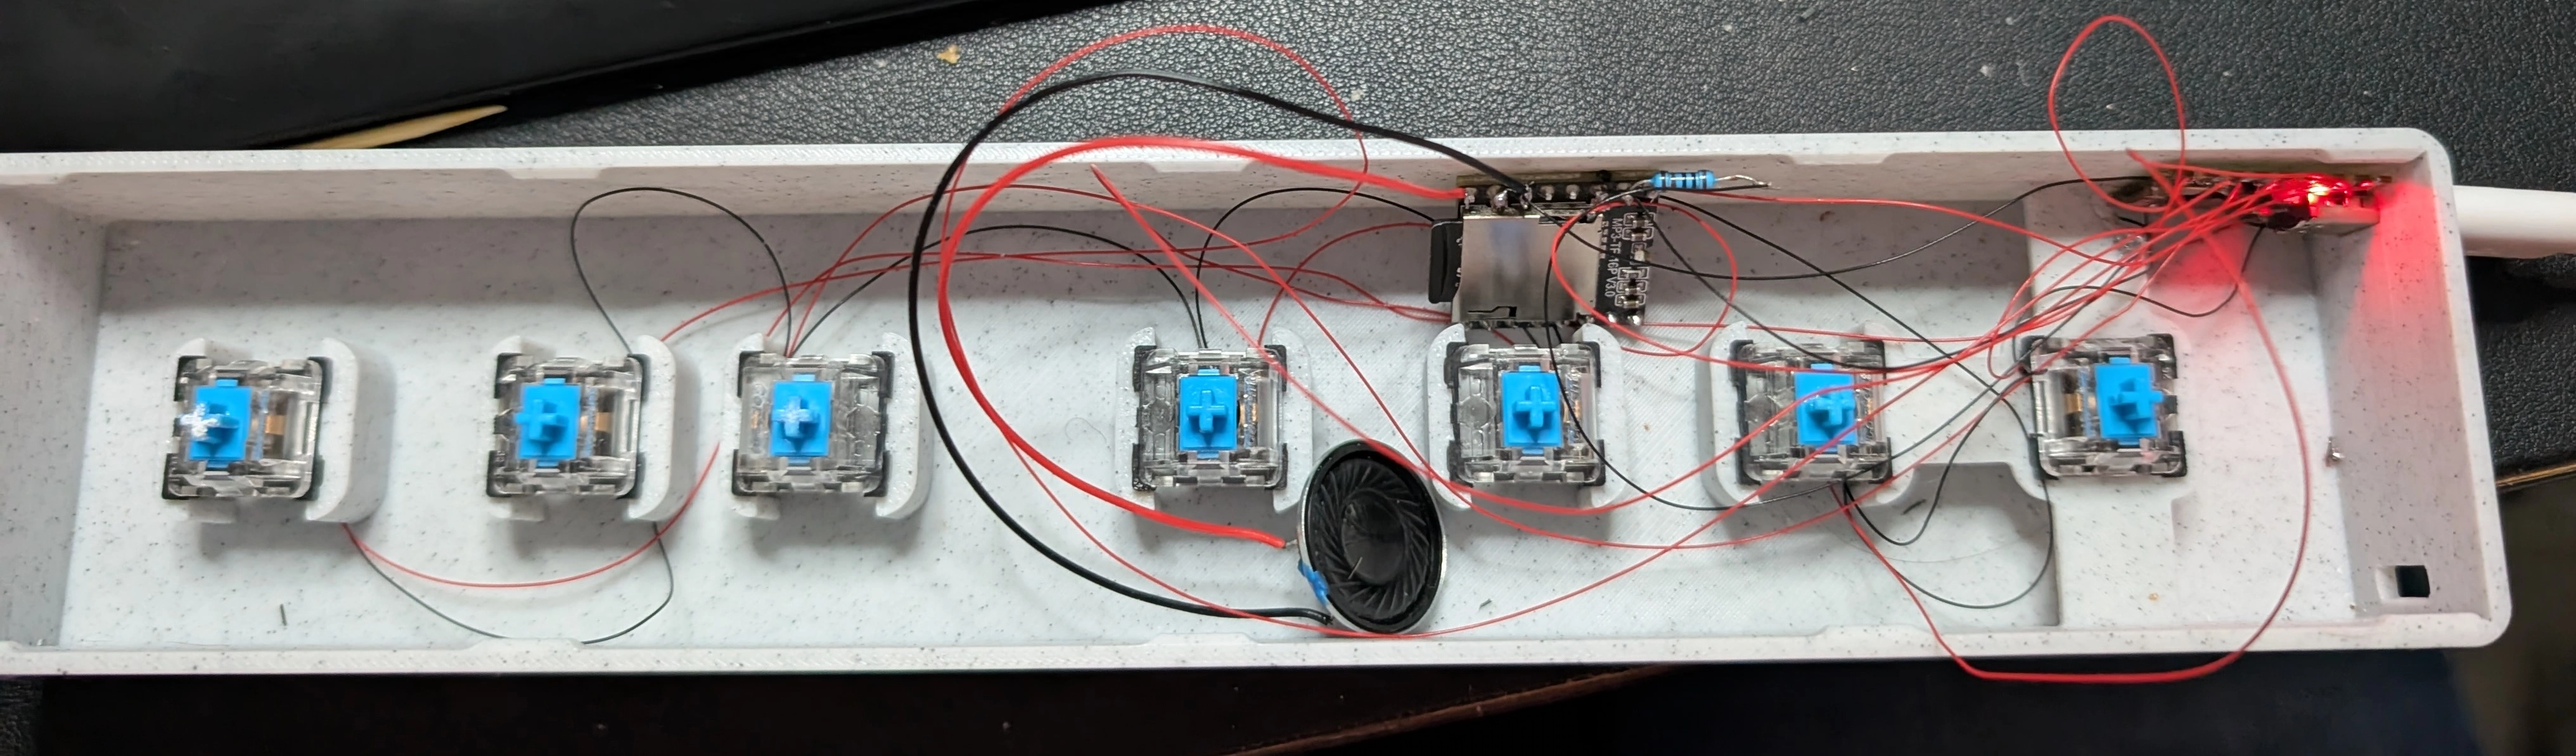
⚠️ Tip: Avoid spaghetti wiring. Clean wiring = easier debugging later. I spent a lot of time trying to figure out where each wire goes.
7. Final code and test E2E before final assembly
Lets start reviewing the code, and understand the logic of the code. This part of the guide explains what each section of the code does so even if it's your first time programming an ESP32 or using C++, you'll feel confident.
Libraries at the Top
#include <Arduino.h>
#include <HardwareSerial.h>
#include <DFRobotDFPlayerMini.h>
Arduino.h: The core library that gives access to functions likepinMode(),digitalRead(),delay(), etc.HardwareSerial.h: This allows us to use one of the ESP32's multiple serial ports (we use Serial1).DFRobotDFPlayerMini.h: The official library to control the DFPlayer Mini easily (likeplay(),pause(),volume()).
Set Up the Serial Port and Sound Module
HardwareSerial mySerial(1);  // Use Serial1 for DFPlayer communication
DFRobotDFPlayerMini mp3;
mySerial(1): We're using UART1 on the ESP32, because ESP32 has more than one serial port.mp3: This is our object to control the DFPlayer Mini (like a remote control).
Define the Button Pins
const int buttonPins[] = {5, 6, 7, 9, 10, 20, 21};  // Button GPIOs
const int totalButtons = sizeof(buttonPins) / sizeof(buttonPins[0]);
- We're using 7 buttons in total.
- These are the GPIO pins that each button is connected to.
totalButtonscalculates the number of buttons automatically, so you don't have to count.
Track the Currently Playing Song
int currentSong = 0; // Track currently playing song (0 = none)
- This variable stores the number of the current song that's playing.
- It helps us pause the song if the same button is pressed again.
Setup Function – Runs Once When Power Is On
void setup() {
    Serial.begin(115200);
    mySerial.begin(9600, SERIAL_8N1, 1, 0);  // RX=16, TX=17 (ESP32 UART2)
Serial.begin(115200): This opens the USB serial monitor for debugging.mySerial.begin(...): Starts communication with the DFPlayer on UART1 using RX = GPIO1, TX = GPIO0.
Note: You can change these pins if you wire your DFPlayer to different GPIOs, just update the numbers here.
Check DFPlayer Is Connected
    if (!mp3.begin(mySerial)) {
        Serial.println("MP3 module not detected!");
        while (true);
    }
- This checks if the DFPlayer Mini is connected and working.
- If not, it prints a message and stops the program using an infinite loop.
Set Volume + Prepare Buttons
    mp3.volume(20);  // Set volume (0–30)

    for (int i = 0; i < totalButtons; i++) {
        pinMode(buttonPins[i], INPUT_PULLUP);
    }
}
mp3.volume(20): Sets the speaker volume. You can go from 0 (mute) to 30 (very loud).INPUT_PULLUP: Tells the ESP32 to use internal resistors to hold the button pins HIGH unless pressed. So a pressed button reads LOW.
Loop Function – Keeps Running Forever
void loop() {
    for (int i = 0; i < totalButtons; i++) {
        if (digitalRead(buttonPins[i]) == LOW) {
- This
forloop goes through each button and checks if it's pressed. - Because of
INPUT_PULLUP, a press reads asLOW.
Play or Pause Logic
int songNumber = i + 1;
- Adds 1 so that button 0 plays song 1 (
0001.mp3), button 1 plays song 2 (0002.mp3), etc.
            if (currentSong == songNumber) {
                mp3.pause();
                currentSong = 0;
                Serial.println("Paused");
- If the same button is pressed again, it pauses the song.
- Sets
currentSongto 0, meaning no song is playing.
            } else {
                mp3.stop();
                delay(100);
                mp3.play(songNumber);
                currentSong = songNumber;
                Serial.print("Playing song: ");
                Serial.println(songNumber);
- If a different button is pressed, it:
- Stops the current song
- Waits briefly (stabilizing delay)
- Starts playing the new song
- Updates
currentSongto the new one
Debouncing and Wait for Button Release
            delay(300);
            while (digitalRead(buttonPins[i]) == LOW);
- Adds a short delay to prevent accidental double presses.
- Waits until the button is released before allowing more inputs.
and here is the final code that you can upload to the ESP32-C3.
#include <Arduino.h>
#include <HardwareSerial.h>
#include <DFRobotDFPlayerMini.h>

HardwareSerial mySerial(1);  // Use Serial1 for DFPlayer communication
DFRobotDFPlayerMini mp3;

const int buttonPins[] = {5, 6, 7, 9, 10, 20, 21};  // Button GPIOs
const int totalButtons = sizeof(buttonPins) / sizeof(buttonPins[0]);

int currentSong = 0;  // Track currently playing song (0 = none)

void setup() {
    Serial.begin(115200);
    mySerial.begin(9600, SERIAL_8N1, 1, 0);  // RX=16, TX=17 (ESP32 UART2)

    if (!mp3.begin(mySerial)) {
        Serial.println("MP3 module not detected!");
        while (true);
    }

    mp3.volume(20);  // Set volume (0-30)

    for (int i = 0; i < totalButtons; i++) {
        pinMode(buttonPins[i], INPUT_PULLUP);
    }
}

void loop() {
    for (int i = 0; i < totalButtons; i++) {
        if (digitalRead(buttonPins[i]) == LOW) {  // Button pressed
            int songNumber = i + 1;  // Map button index to song (001-007)

            if (currentSong == songNumber) {
                mp3.pause();  // Pause if the same button is pressed again
                currentSong = 0;
                Serial.println("Paused");
            } else {
                mp3.stop();  // Stop current song
                delay(100);  // Small delay for stability
                mp3.play(songNumber);  // Play new song
                currentSong = songNumber;
                Serial.print("Playing song: ");
                Serial.println(songNumber);
            }

            delay(300);  // Debounce delay
            while (digitalRead(buttonPins[i]) == LOW);  // Wait for button release
        }
    }
}
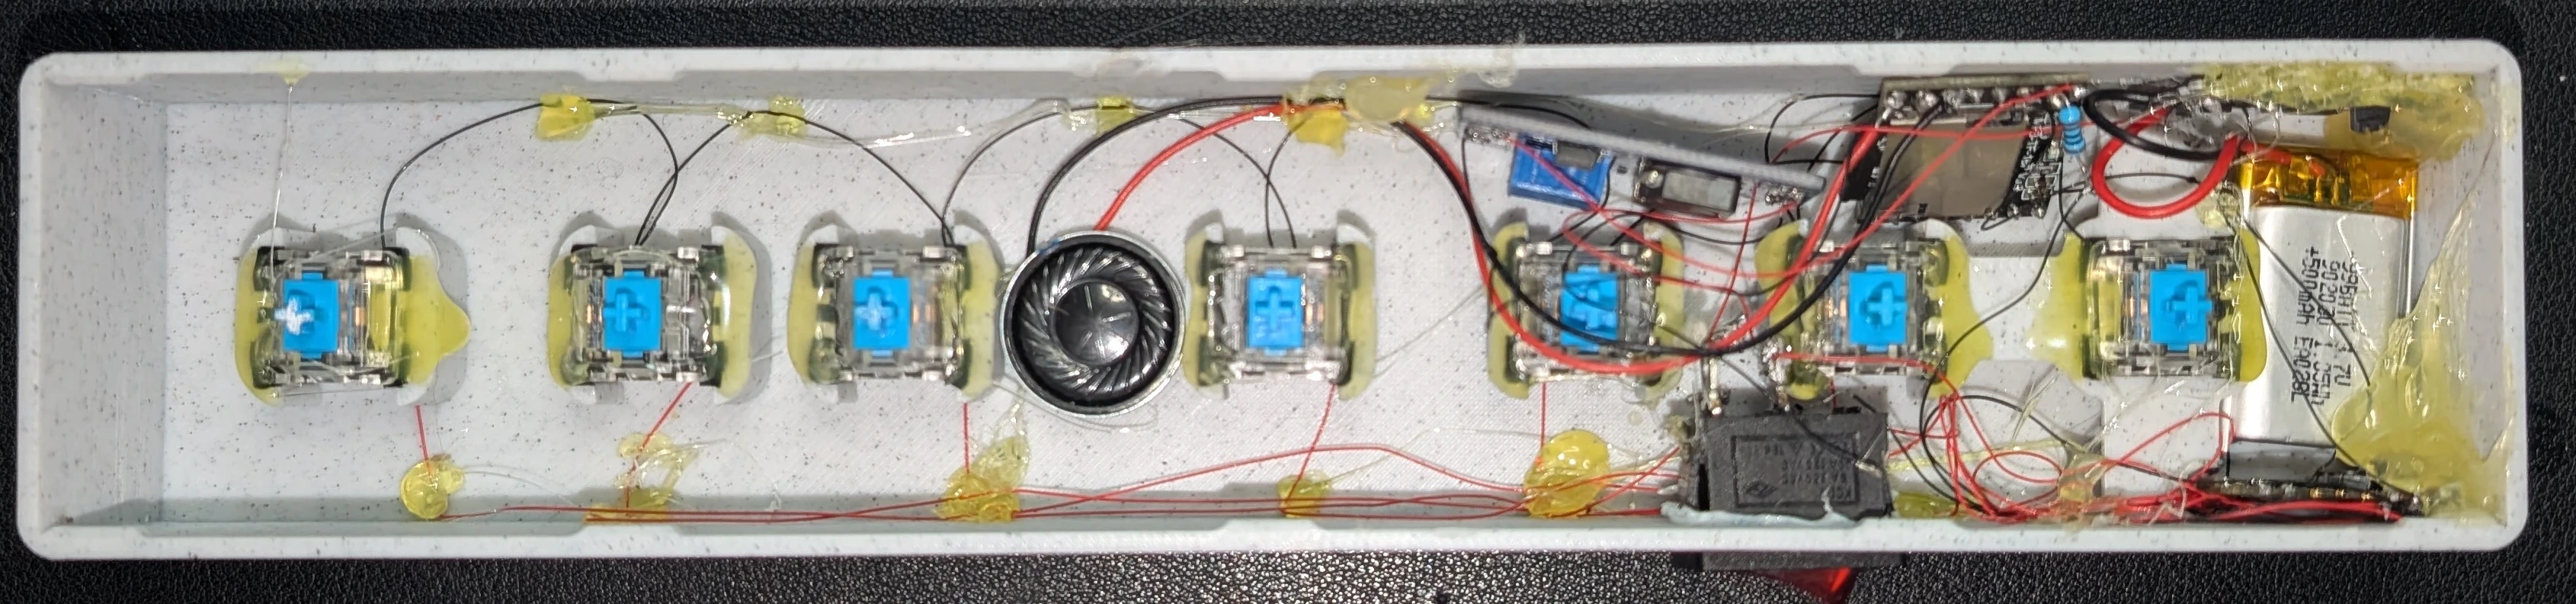
8. Final Assembly + Anchoring
Time to finish the build:
- Carefully place all components inside the keyboard housing
- Use hot glue to anchor parts:
- DFPlayer Mini
- TP4056
- MT3608
- Battery
- Route the wires neatly
- Close up the toy, power it on, and press each button...
Prerequisites
Before starting this project, ensure you have all the required materials and tools listed in the sidebar. Basic soldering experience and familiarity with Arduino programming will be helpful.
Materials
- ESP32-C3 Super Mini$2.99
- DFPlayer Mini$1.85
- Micro SD Card$5.00
- Lithium Battery $4.59
- Mechanical Switches$3.00
- Speaker$1.98
- Charger$1.24
- Boost Converter$1.15
- Power Switch$1.04
- Total Cost$22.84
Resources
Required Tools
- Soldering Iron
- Wire Strippers
- Multimeter
- 3D PrinterOptional
- Hot Glue GunOptional
- Helping HandsOptional