GalMakes
Getting Started with Electronics
A comprehensive guide to learning electronics fundamentals, from basic components to building your first circuits.
Getting Started with Electronics: Tools, Platforms, and Learning Resources
Introduction
The world of electronics is this amazing mix of coding and electricity—like magic you can control with your hands. For many, it all starts with one big question: "How does the internet even work?" I mean, think about it—how does a photo you upload on your phone end up on someone else's screen halfway across the world in just seconds? That simple question cracked open a whole world of curiosity for me. At first, I thought it was all just software—servers, code, networks. But the deeper I looked, the more I realized that everything boils down to electricity. Bits and bytes flying through copper wires and fiber optics are really just electrical signals—on and off, high and low, 1s and 0s. That blew my mind.
Behind every browser tab, every app, every social media post… there's a river of electrons flowing through tiny circuits, making it all happen. So I started asking more questions: How do computers understand those 1s and 0s? What's inside a chip? How does code turn into action? That curiosity led me from the internet to the hardware inside personal computers, then down into the world of programming, and finally into building things myself—with wires, breadboards, microcontrollers, and code.
I'm writing this blog to cover core terms and concepts at a high level. As you read, you'll gain context and the ability to start exploring each topic. Share and explore these terms across the open web, where you'll encounter endless amounts of information—each topic here represents an entire world of knowledge.
Understanding the Wiring
Before we start buying sensors, wires, and soldering kits, let's slow down for a second. One of the best things about electronics today is that you don't have to spend a lot of money—or even leave your chair—to start learning.
Thanks to amazing online simulators, you can build and test your circuits virtually, learning the basics without burning a single LED. But before you jump into simulation or real-world wiring, it's important to understand what's actually flowing through those little lines: electricity. And more importantly, how we control it.
The Language of Circuits: Core Electronic Components
At the heart of every circuit are a few key parts—like characters in a story. Each one plays a specific role in controlling the invisible flow of electrons.
Resistor – The flow regulator. It slows things down, protects components from getting fried, and helps divide voltage between parts.
Capacitor – The energy bank. It stores electricity and then releases it at just the right moment—great for smoothing out signals and timing events.
Diode – The traffic director. It only lets current flow in one direction. Think of it like a one-way street for electricity. LEDs (light-emitting diodes) are its flashy cousins.
Transistor (BJT or MOSFET) – The muscle and the brain.
This is where it gets exciting. A transistor can switch things on and off, or amplify a signal. It's small, but mighty—used in everything from simple sensors to the brains of modern computers. MOSFETs are a popular type because they're efficient and fast.

Enter the Microcontroller
Now imagine combining millions of these tiny transistors into one smart chip that can read inputs, run code, and control outputs. That's exactly what a microcontroller does.
It's like having a tiny robot brain that listens, decides, and acts—based entirely on what you program it to do.
Let's say you tell your Arduino: "If this button is pressed, turn on the LED."
What actually happens inside the chip is a cascade of logic gates, flipping on and off at lightning speed to turn that command into action.
Even though it feels like you're just writing simple code, you're really instructing millions of tiny switches inside the microcontroller, all built from transistors, to open and close in specific patterns.
So while we mostly deal with microcontrollers at the code level, underneath the surface, they are pure hardware magic—built on a foundation of the components you just learned about.
Logic Gates: Electricity's Decision-Makers
At the deepest level, microcontrollers think in a binary language—HIGH (1) or LOW (0). These are just voltage levels, but with them, we can express logic and make decisions.
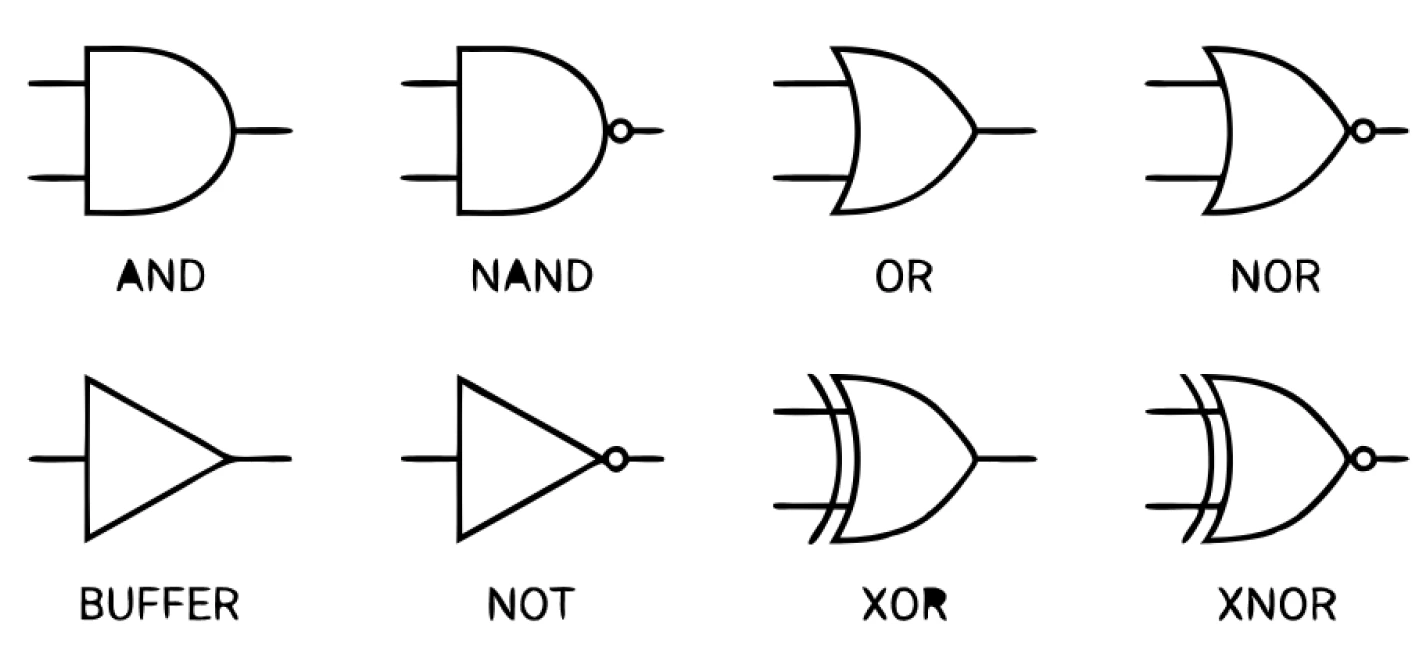
Logic gates are tiny electronic decision-makers made from transistors. Each one does a simple job: it looks at the inputs and decides what the output should be.
Here are the most common ones:
- AND – Both inputs must be ON to get an ON output.
- OR – If either input is ON, the output is ON.
- NOT – Flips the input (1 becomes 0, and 0 becomes 1).
- NAND – The opposite of AND.
- BUFF – Outputs whatever input it gets.
- NOR – The opposite of OR.
- XOR – Outputs ON only if the inputs are different.
- XNOR – Outputs ON only if the inputs are the same.
When millions of these gates are combined, you get a system that can add, compare, store, and control data. This is how your microcontroller "thinks"—not in code, but in pure logic and electricity.
Start Simulating
Now that we've explored the basics of electricity and core components, it's time to bring those concepts to life—to actually see how your ideas behave in a real circuit. And the cool part? You don't need to buy anything or risk burning your fingers with solder. Thanks to online simulators, your first electronic experiment can happen right in your browser!
If you're completely new to electronics and coding, I highly recommend starting with [Tinkercad Circuits] by Autodesk. It's free, super beginner-friendly, and comes packed with great tutorials to walk you through the basics. You can start with their block-based coding interface, which is visual and intuitive—no need to write complex code right away.
For those of you who already have some programming experience or feel confident about the basics of electronics, check out [Wokwi] It's an awesome simulator built for testing code with microcontrollers like Arduino and ESP32. You can simulate buttons, LEDs, displays, sensors, and more—making it perfect when you want to focus on the code and logic without needing all the physical parts.
Whether you start with Tinkercad or jump into Wokwi, the key is to experiment, have fun, and learn by doing.
After spending some time with Tinkercad, you'll eventually reach a point where you want to take things further—start building your own ideas, or physically test the lessons you've learned. That's when you realize real-world projects come with new and exciting challenges: how to connect actual sensors, work with components that aren't available in the simulator, and integrate electronics into something meaningful and tangible.
Creating Your Own Code
Once you're ready to move beyond simulators and start building your own projects, you'll need a few things:
- Some basic electronic components and tools (don't worry, I'll cover what you need later)
- And a proper coding environment to write and upload code to your microcontrollers—like the Arduino Uno, ESP32, and others.
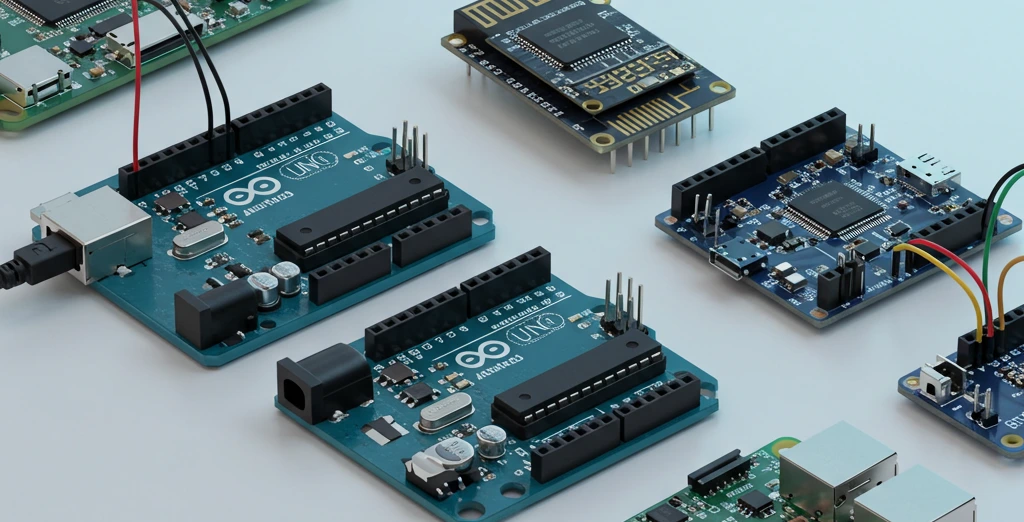
Option 1: Arduino IDE – Perfect for Beginners
If you're just starting out with coding, the Arduino IDE is a great place to begin.
Arduino is an open-source platform made for hobbyists, educators, and makers of all levels. It includes two things:
- A microcontroller board (like the classic Arduino Uno)
- And a simple, beginner-friendly coding environment where you can write and upload your code.
Option 2: PlatformIO + VS Code – For Intermediate to Advanced Users
If you're already comfortable with coding or want to level up quickly, I recommend switching to PlatformIO, an extension for Visual Studio Code (VS Code).
Here's why PlatformIO is a game-changer:
- 📁 Organized Project Structure – Makes it easier to manage bigger, multi-file projects.
- 🧠 Intelligent Autocomplete (IntelliSense) – Helps you code faster and catch errors early.
- 📚 Built-in Library Manager – No more hunting down zip files manually.
- 🔁 Supports Multiple Boards – One day ESP32, next day Arduino Nano? No problem.
A Word of Advice Before You Dive In
There's no magic tool that will do everything for you.
Even with powerful AI and code generation tools, you still need to understand the fundamentals—how electricity works, the principles behind electronics, and the basics of how code runs on physical hardware.
In today's world of AI tools and large language models (LLMs), it's easy to feel like you can shortcut everything. But if you skip the core concepts, you'll likely get stuck in endless loops of trial and error. To truly master electronics and coding, you need to understand how the physical and digital worlds interact.
Bringing AI Into the Mix
Now that we've got that out of the way—yes, you can (and should!) leverage AI to boost your workflow. I personally love using Cursor (a developer-focused AI code editor with a great free plan). Combine it with PlatformIO, and you've got a seriously powerful toolkit.
Here are some examples of how I use AI tools in my workflow:
- Get quick explanations for datasheets and components
- Generate boilerplate code for sensors or peripherals
- Debug tricky logic faster
- Optimize code for performance or memory usage
Resources
- Computer electronics
A comprehensive guide to learning electronics fundamentals. with the context of the internet.
- Electronic Components Explained
Series of videos explaining the basics of electronics
- Tinkercad Circuits
Free online circuit simulator for beginners
- Wokwi
Advanced simulator for Arduino and ESP32
- Arduino IDE
Beginner-friendly coding environment
- PlatformIO
Professional development environment for VS Code
- Cursor
AI code editor